Healthy Cake Recipes Without Oven: Your Guide to Guilt-Free Cake Therapy
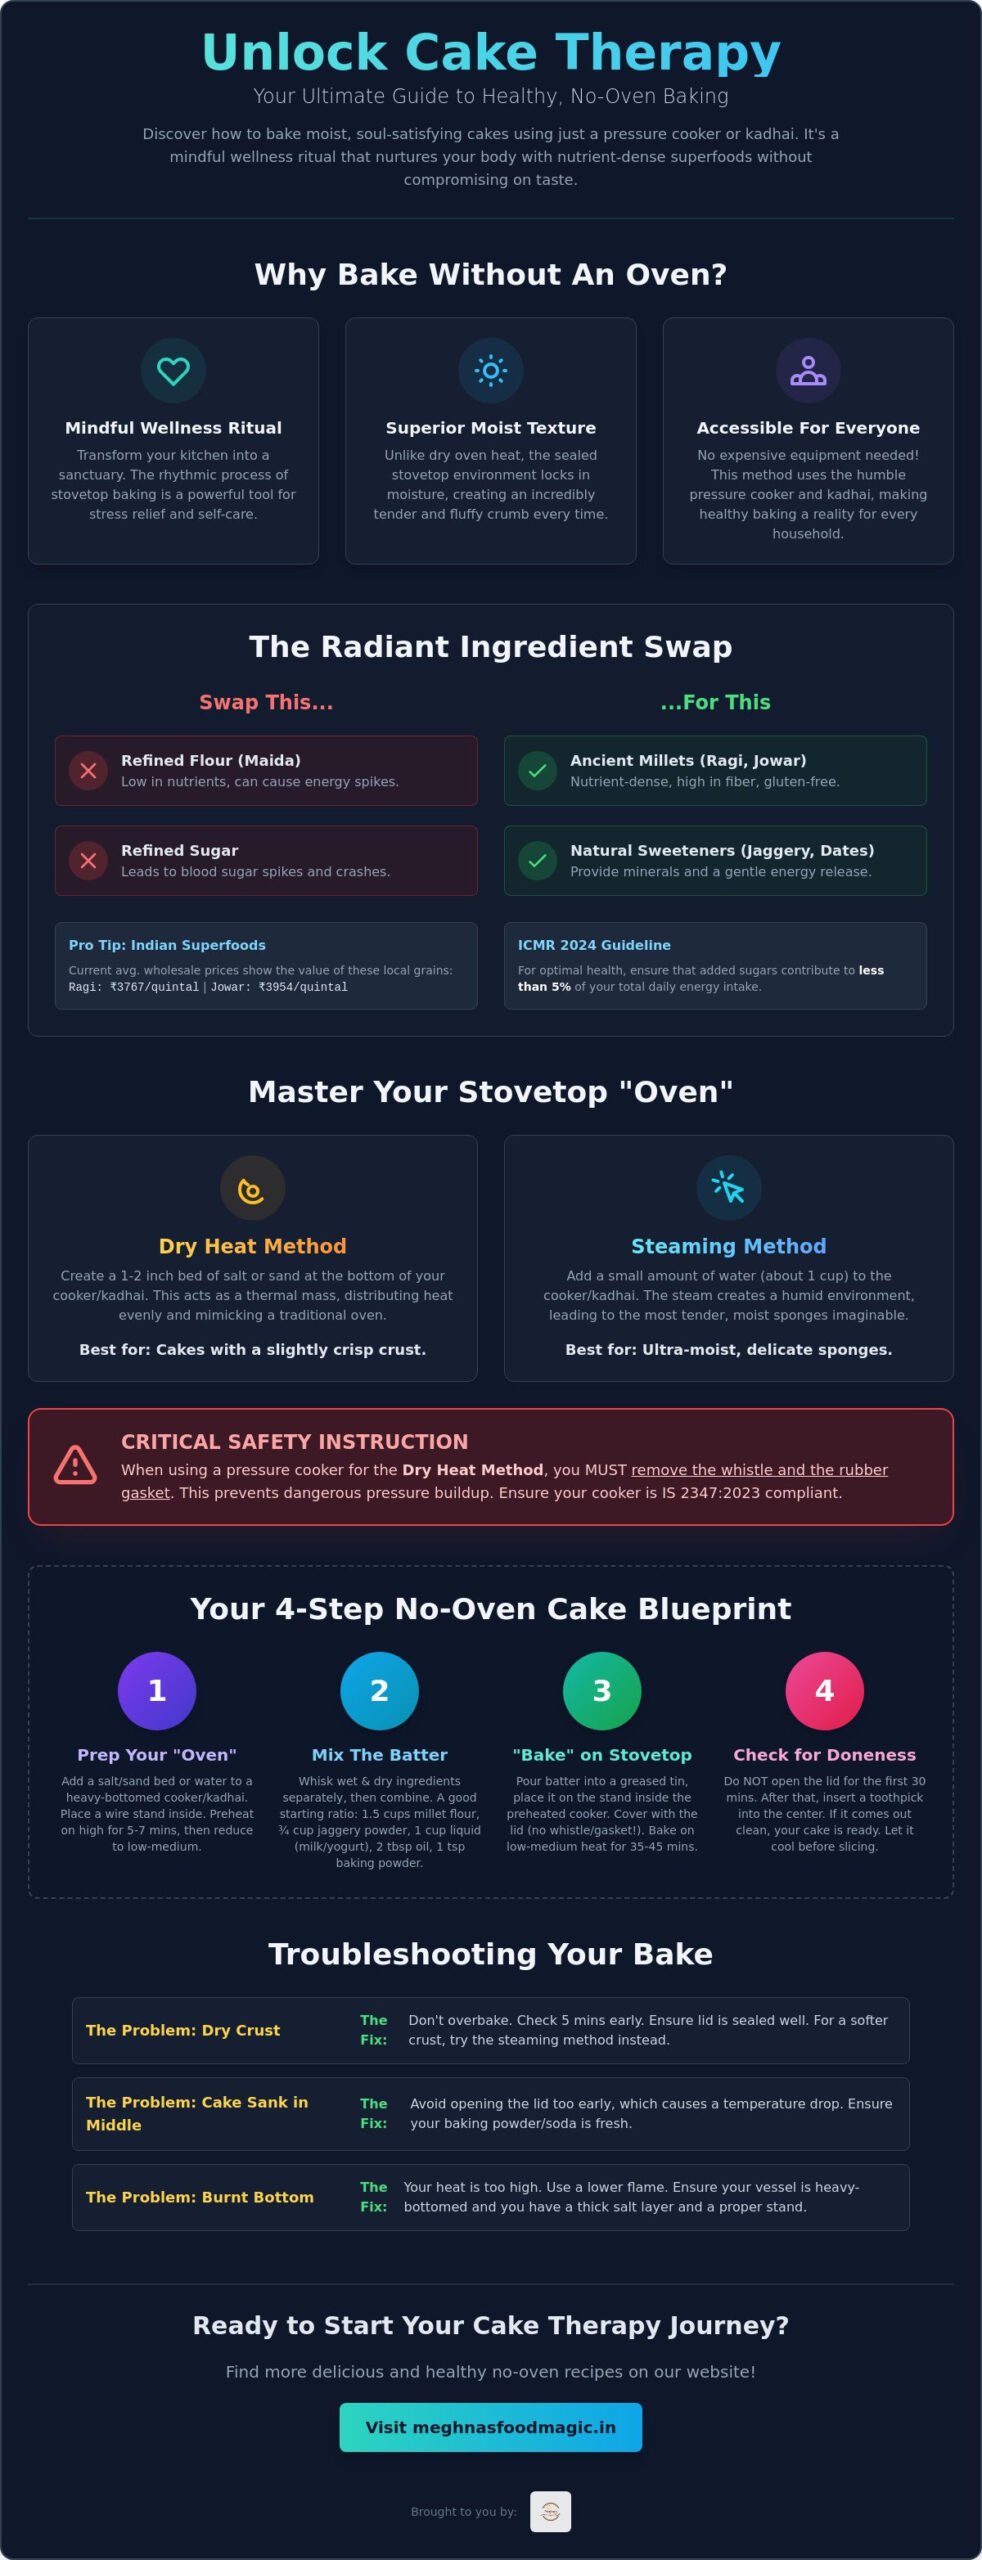
Who said indulging your sweet tooth has to come with a side of guilt or an expensive oven? Imagine creating moist, decadent, and utterly soul-satisfying cakes using the very tools sitting in your Indian kitchen right now. This isn’t just about baking; it’s about embracing a form of self-care we call “Cake Therapy.” Discover how to create moist, nutritious, and soul-satisfying cakes using everyday Indian kitchen tools like pressure cookers and kadhais.
Cake Therapy: Why Baking Without an Oven is the Ultimate Wellness Ritual
Baking, at its heart, is a transformative act. It’s about turning simple, humble ingredients into something warm, comforting, and joyful. When you remove the technical complexities of a conventional oven and embrace the familiar hum of a pressure cooker on the stove, that transformation becomes even more profound. This is the essence of Cake Therapy.
- Defining ‘Cake Therapy’: We see it as a mindful, creative practice for stress relief and self-care. It’s the rhythmic motion of whisking a batter, the intoxicating aroma that fills your home, and the pure delight of a successful bake.
- Accessible to Every Indian Household: The no-oven approach democratizes baking. It breaks down the barrier that an oven—often seen as a bulky, Western appliance—can create, making delicious, healthy cakes a possibility for everyone.
- The Joy of Nutrient-Rich Treats: This isn’t about recreating maida-and-sugar bombs. It’s about the joy of crafting high-protein, fiber-rich treats from scratch, using the goodness of millets, jaggery, and whole grains.
- The Moisture-Lock Secret: Stovetop methods, especially steaming, create a humid environment that locks in moisture far more effectively than the dry heat of a traditional oven, resulting in incredibly soft and tender cakes.
The Emotional Benefits of Mindful Baking
In a world of constant notifications and deadlines, the kitchen can become a sanctuary. Mindful baking is a sensory experience that grounds you in the present moment. It’s about feeling the texture of the flour, watching the batter come together, and being guided by your senses.
- Your Kitchen, Your Sanctuary: Transform a routine chore into a creative escape. The focus required for measuring and mixing allows your mind to quiet down, offering a meditative break from daily stressors.
- The Best Aromatherapy: Forget scented candles. The rich, earthy aroma of a Ragi chocolate cake or the bright, zesty scent of a lemon sponge slowly cooking on your stovetop is a natural mood-lifter that fills your home with warmth.
- A Shared Family Experience: No-oven baking feels less intimidating and more like a fun experiment. It’s the perfect activity to involve children or other family members in, creating memories without the pressure of “technical” perfection.
Inclusivity in the Kitchen
Cake Therapy is for everyone. It’s a celebration of our roots, our ingredients, and our ingenious cooking methods. It’s about reclaiming baking as a part of our own culinary heritage.
- Breaking the Appliance Myth: You don’t need expensive, specialized equipment to be a “real” baker. Your trusty pressure cooker is more than capable of producing bakery-worthy results.
- Celebrating Indian Vessels: We honor the versatility of the Kadhai and Pressure Cooker—the workhorses of the Indian kitchen. They are not just for curries and dals; they are magnificent baking vessels waiting to be discovered.
- Health for All: By using locally sourced millets, jaggery, and other wholesome ingredients, we make health-conscious desserts affordable and available to everyone, no matter where they are.
The Science of Stovetop Baking: Mastering the Pressure Cooker and Kadhai
Baking on a stovetop might seem like magic, but it’s pure science. Understanding how heat works inside a sealed metal pot is the key to unlocking perfectly baked cakes every single time. It’s not just about removing the whistle; it’s about creating a controlled heating environment that mimics a conventional oven.
- Heat Convection 101: In a sealed cooker or a covered kadhai, the air heats up, circulates (convection), and cooks the batter evenly from all sides—just like in an oven.
- The “Dry Heat” Method: This involves creating a base layer of salt or sand at the bottom of your pressure cooker. This layer absorbs and distributes the flame’s heat evenly, preventing the cake tin from getting direct, scorching heat. This is ideal for achieving a classic “baked” texture.
- The “Steaming” Method: Here, you place water at the bottom of the vessel. The steam generated creates a super-moist environment, perfect for delicate sponge cakes, dhokla-style cakes, and whole-wheat bakes that can otherwise turn out dry.
- Critical Safety Checks: Always remove the whistle (vent weight) to prevent pressure from building up. Most experts also recommend removing the rubber gasket from the lid to be extra safe and to prevent it from melting over time.
Setting Up Your No-Oven “Oven”
Your journey to a perfect stovetop cake begins with a proper setup. Think of it as building a mini-oven right on your gas stove. It takes just two minutes and makes all the difference.
- Step 1: Choose the Right Vessel: A heavy-bottomed pressure cooker (at least 5 litres is ideal) or a deep, heavy-bottomed kadhai with a well-fitting lid is essential. A thick base prevents the bottom from burning before the cake is cooked through.
- Step 2: Use a Stand/Ring: Never place your cake tin directly on the bottom of the cooker or kadhai. Always place a small metal stand, a wire rack, or even an inverted steel bowl inside. This elevates the cake tin, allowing hot air to circulate underneath for even cooking.
- Step 3: Manage the Lid: For a pressure cooker, close the lid securely after removing the whistle and gasket. For a kadhai, use a lid that covers it completely to trap the heat. If your lid has a steam vent, you can plug it with a small ball of dough.
Mastering Temperature Control
The single biggest challenge in stovetop baking is heat management. Unlike an oven with a precise thermostat, you have to rely on your flame. But it’s easier than you think!
- The “Pre-heating” Ritual: This step is non-negotiable. Place your cooker/kadhai with the stand inside on the stove, cover it, and heat it on a medium flame for 8-10 minutes. This ensures the internal environment is hot and ready, helping your cake rise evenly from the moment it goes in.
- Low Flame is Your Best Friend: Once you place the cake tin inside, turn the flame to the absolute lowest setting. For whole wheat and millet cakes, which can burn easily, a slow and steady heat is the secret to a perfect bake. A simmer flame is often too low; you need a steady, small flame.
- Resist the Urge to Peek: Opening the lid frequently causes the trapped heat to escape, leading to a drastic temperature drop. This is the most common reason why cakes sink in the middle. Wait until at least 75% of the recommended baking time has passed before you open the lid to check for doneness.
From Refined to Radiant: Swapping Maida for Millets and Superfoods
The true magic of our Cake Therapy lies in the ingredients. We’re moving away from empty calories and embracing the nutritional powerhouses of the Indian pantry. This is where your cake transforms from a simple indulgence into a genuinely nourishing treat.
- The Millet Renaissance: Millets like Ragi, Jowar, and Bajra are gluten-free, high in fiber, and packed with minerals. Their earthy, nutty flavours add incredible depth to cakes, especially when paired with chocolate, spices, or fruits.
- Jaggery and Dates: Say goodbye to refined white sugar! Jaggery (gur) and date paste are fantastic natural sweeteners that bring their own caramel-like flavour and a host of minerals. They provide sweetness without the sharp spike in blood sugar.
- Healthy Fats for a Softer Crumb: Ditch refined vegetable oils. We champion traditional fats like ghee, which adds a beautiful aroma, or neutral-tasting, cold-pressed oils like sunflower or groundnut oil. A good fat is crucial for a moist cake.
- The Eggless Crumb Champions: Curd (yogurt) is a star ingredient in eggless baking. Its acidity reacts with baking soda to create a wonderfully soft and fluffy texture. For a vegan option, a “flax-egg” (ground flaxseed mixed with water) works beautifully as a binder.
Millet Magic: Ragi and Jowar Ratios
Working with millets is a rewarding experience, but they behave differently from refined flour. They are thirstier and denser. Here’s how to get started.
- Ragi (Finger Millet) – The Chocolate King: Ragi’s deep, malty flavour makes it the perfect partner for chocolate. Its dark colour creates visually stunning, rich chocolate cakes. A little goes a long way in providing iron and calcium.
- Jowar (Sorghum) – The Vanilla Queen: Jowar has a milder, more neutral flavour, making it excellent for lighter-coloured cakes like vanilla, lemon, or fruit-based sponges. It creates a surprisingly soft and delicate crumb.
- The 50/50 Rule for Beginners: If you’re new to millets, don’t go all in at once. Start by replacing 50% of the whole wheat flour in a recipe with your millet of choice (e.g., half a cup of whole wheat flour and half a cup of ragi flour). This gives you a feel for the texture while still ensuring a successful bake.
Sweetening Without the Guilt
Natural sweeteners do more than just add sweetness; they add moisture, flavour, and nutrients. Here’s how to use them effectively in no-oven cakes.
- The Jaggery Powder Secret: To prevent jaggery from curdling milk or curd in your batter, mix the jaggery powder with the wet ingredients (like oil and curd) first, before adding any milk. Whisk until it’s a smooth paste.
- Date Paste for Moisture: Simply blend a cup of soft, pitted dates with a little hot water to create a thick paste. This can replace a significant portion of the sweetener in a recipe and acts as a fantastic binder and moisture-retaining agent, especially in dense cakes.
- The Glycemic Index of jaggery is lower than that of white sugar, meaning it releases energy more slowly and helps prevent sudden blood sugar spikes.
3 Signature Healthy No-Oven Cake Recipes to Try Today
Ready to put theory into practice? Here are three tried-and-tested recipes that embody the spirit of Cake Therapy. They are simple, forgiving, and absolutely delicious, designed specifically for your pressure cooker or kadhai.
The “Guilt-Free” Ragi Chocolate Cooker Cake
This is the ultimate starter recipe. It’s rich, fudgy, and packed with the goodness of Ragi. The touch of coffee deepens the chocolate flavour, making it taste incredibly decadent.
Ingredients:
- 1 cup Ragi Flour (Finger Millet Flour)
- ½ cup Whole Wheat Flour (Atta)
- ⅓ cup Unsweetened Cocoa Powder
- 1 tsp Instant Coffee Powder
- 1 tsp Baking Powder
- ½ tsp Baking Soda
- A pinch of Salt
- ¾ cup Jaggery Powder
- 1 cup warm Milk
- ½ cup Curd (Yogurt), at room temperature
- ¼ cup any neutral vegetable oil or melted Ghee
Instructions for the “Salt-Bed” Cooker Method:
- Prepare the Cooker: Take a 5-litre pressure cooker. Spread a 1.5-inch layer of salt or sand at the bottom. Place a wire stand over the salt. Remove the gasket and whistle from the lid. Close the lid and preheat the cooker on a medium flame for 10 minutes.
- Prepare the Cake Tin: Grease a 6 or 7-inch cake tin with oil and dust it with some whole wheat flour. Tap out the excess.
- Mix Dry Ingredients: In a large bowl, sift together the ragi flour, whole wheat flour, cocoa powder, coffee powder, baking powder, baking soda, and salt. This ensures there are no lumps and the leavening agents are well distributed.
- Mix Wet Ingredients: In another bowl, whisk the jaggery powder and oil until creamy. Add the curd and whisk well until smooth.
- Combine: Gently fold the dry ingredients into the wet ingredients. Gradually add the warm milk and mix until you have a smooth, lump-free batter of pouring consistency. Do not overmix.
- Bake: Pour the batter into the prepared cake tin. Carefully open the preheated cooker and place the cake tin on the stand. Close the lid (without whistle and gasket) and bake on a low flame for 40-50 minutes.
- Check for Doneness: After 40 minutes, insert a toothpick or skewer into the center of the cake. If it comes out clean, the cake is done. If not, bake for another 5-10 minutes.
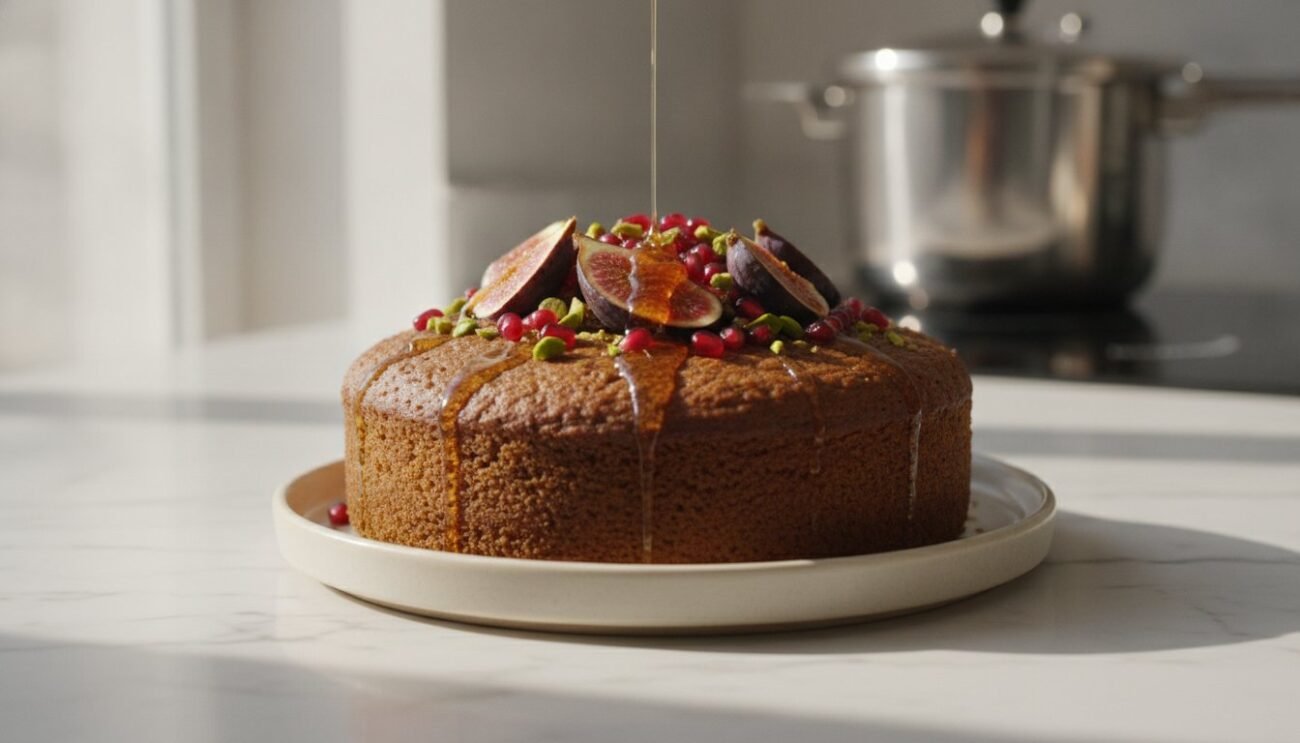
- Cool and Serve: Turn off the flame and carefully remove the cake tin from the cooker. Let it cool in the tin for 10-15 minutes before inverting it onto a wire rack to cool completely. Serve with a drizzle of honey or homemade nut butter.
Steamed Whole Wheat & Yogurt Lemon Sponge
This cake is light, airy, and bursting with fresh citrus flavour. The steaming method guarantees a super moist, tea-cake texture that is simply irresistible.
Ingredients:
- 1 ½ cups Whole Wheat Flour (Atta)
- 1 cup powdered Jaggery or powdered sugar
- 1 cup thick Curd (Yogurt), at room temperature
- ½ cup Milk, at room temperature
- ¼ cup Oil
- 1 ½ tsp Baking Powder
- ½ tsp Baking Soda
- 1 tbsp Lemon Zest
- 2 tbsp Lemon Juice
Instructions for the Steaming Method:
- Prepare the Steamer/Kadhai: Pour 1.5-2 cups of water into a deep kadhai or a large pot. Place a stand in the center. Cover and bring the water to a boil over a medium flame.
- Prepare the Cake Tin: Grease and flour a 6-inch cake tin. You can also line it with parchment paper.
- Mix Wet Ingredients: In a bowl, whisk the curd and powdered jaggery until smooth and creamy. Add the oil, milk, lemon zest, and lemon juice. Whisk everything together until well combined.
- Mix Dry Ingredients: Sift the whole wheat flour, baking powder, and baking soda directly over the wet mixture.
- Combine: Gently fold the dry ingredients into the wet using a spatula. Mix only until the batter is just combined. A few small lumps are okay; overmixing will make the cake tough.
- Steam the Cake: Pour the batter into the prepared tin. By now, the water in the kadhai should be boiling. Reduce the flame to medium, carefully place the cake tin on the stand, and cover the kadhai with a tight-fitting lid. To prevent water droplets from falling on the cake, you can wrap the lid in a kitchen towel.
- Cook: Steam the cake for 30-35 minutes on a medium-low flame. Do not open the lid for the first 25 minutes.
- Check and Cool: After 30 minutes, check with a toothpick. If it comes out clean, your cake is ready. Turn off the flame, remove the tin, and let it cool for 10 minutes before demoulding. Let it cool completely before slicing. For extra fiber and flavour, you can add chopped nuts or seasonal fruits like berries to the batter.
High-Protein Paneer and Oats “Cheesecake” (No-Bake/No-Oven)
A truly magical creation that tastes indulgent but is packed with protein. This no-bake cheesecake uses paneer for a creamy texture and an oat-date base for a wholesome crunch. It’s the perfect guilt-free dessert.
Ingredients:
- For the Base:
- 1 cup Rolled Oats
- ½ cup soft, pitted Dates
- 2 tbsp melted Ghee or Coconut Oil
- For the Filling:
- 200g fresh Paneer, crumbled
- 1 cup Hung Curd (thick yogurt, strained of all water)
- 3-4 tbsp Honey or Maple Syrup (adjust to taste)
- 1 tsp Vanilla Extract
- 1 tbsp Lemon Juice
Instructions (No-Bake Method):
- Prepare the Tin: Lightly grease a 6-inch springform pan or a regular tin lined with plastic wrap for easy removal.
- Make the Base: In a blender or food processor, pulse the rolled oats until they have a coarse, crumbly texture. Add the pitted dates and melted ghee, and blend again until the mixture starts to stick together when pressed.
- Set the Base: Press this mixture firmly and evenly into the bottom of your prepared tin. Use the back of a spoon or a flat-bottomed glass to pack it down tightly. Place it in the refrigerator to chill while you make the filling.
- Make the Filling: In a clean blender jar, combine the crumbled paneer, hung curd, honey/maple syrup, vanilla extract, and lemon juice. Blend until the mixture is completely smooth and creamy. Scrape down the sides as needed to ensure there are no lumps.
- Assemble: Pour the creamy paneer filling over the chilled oat base and spread it evenly with a spatula.
- Chill to Set: Cover the tin with plastic wrap and refrigerate for at least 4-6 hours, or preferably overnight, until the cheesecake is firm.
- Serve: Once set, carefully release the cheesecake from the tin. Garnish with fresh fruits, berries, or a sprinkle of nuts before serving.
Cake Therapy Customizations
Once you’ve mastered the basics, feel free to play! These recipes are a canvas for your creativity.
- Add a Nutritional Crunch: Mix in a tablespoon of seeds like chia, pumpkin, or sunflower seeds into the batter for added texture and nutrients.
- Use Ayurvedic Spices: Enhance the flavour and health benefits by adding a pinch of cardamom, cinnamon, nutmeg, or dry ginger powder to your cakes.
- For more eggless inspiration, check out our full Cake Therapy collection.
The Secret to the Perfect Crumb: Troubleshooting Your No-Oven Bakes
Your first few attempts might not be perfect, and that’s completely okay! Every stovetop and cooker has its own personality. Here’s a guide to understanding and fixing common no-oven baking issues.
- Why did my cake sink in the middle? This is the classic “Lid-Peeking” problem. Opening the lid too early causes a sudden drop in temperature, making the partially-set structure of the cake collapse. Be patient!
- How to fix a dry or hard crust? This usually happens when the flame is too high or the baking time is too long. Ensure you’re using the lowest possible flame. Also, whole grain flours absorb more moisture, so make sure your batter isn’t too thick.
- The Cooling Ritual: Don’t be in a hurry to slice. Letting the cake rest and cool completely is crucial. This allows the crumb to set properly, preventing it from being gummy or falling apart.
- Storage Tips: Store millet and whole wheat cakes in an airtight container in the refrigerator. Because they are so moist and free of preservatives, they are best consumed within 2-3 days.
Common No-Oven Mistakes to Avoid
Avoid these simple pitfalls to drastically increase your chances of a perfect bake on the very first try.
- Mistake 1: Not pre-heating the vessel. This is like putting a cake in a cold oven. The batter just sits there, and the leavening agents lose their power before they can do their job, resulting in a flat, dense cake.
- Mistake 2: Using a high flame. This is the fastest way to a baking disaster. You’ll end up with a burnt, bitter bottom and a raw, gooey middle. Low and slow is the mantra.
- Mistake 3: Using a thin-bottomed kadhai. A thin base cannot distribute heat evenly. It creates hotspots that will burn the cake in some places while leaving it undercooked in others. A heavy base is your best insurance policy.
Texture Fixes for Millet Cakes
Millet flours are wonderful but can sometimes result in a denser cake. Here are two pro tips to achieve a softer texture.
- Bloom the Flours: Before adding other ingredients, try mixing your millet flours with hot milk or water and letting the mixture sit for 10-15 minutes. This “blooming” process helps soften the grains, leading to a much more tender final product.
- The Jaggery & Soda Trick: Jaggery is naturally acidic. Adding an extra pinch of baking soda (in addition to what the recipe calls for) to batters sweetened with jaggery can give your cake an extra lift, making it lighter and fluffier.
- To test for doneness without losing too much heat, open the lid just enough to quickly and confidently insert a skewer into the very center of the cake.
