
How to Bake Choco Lava Cake with a Molten Center
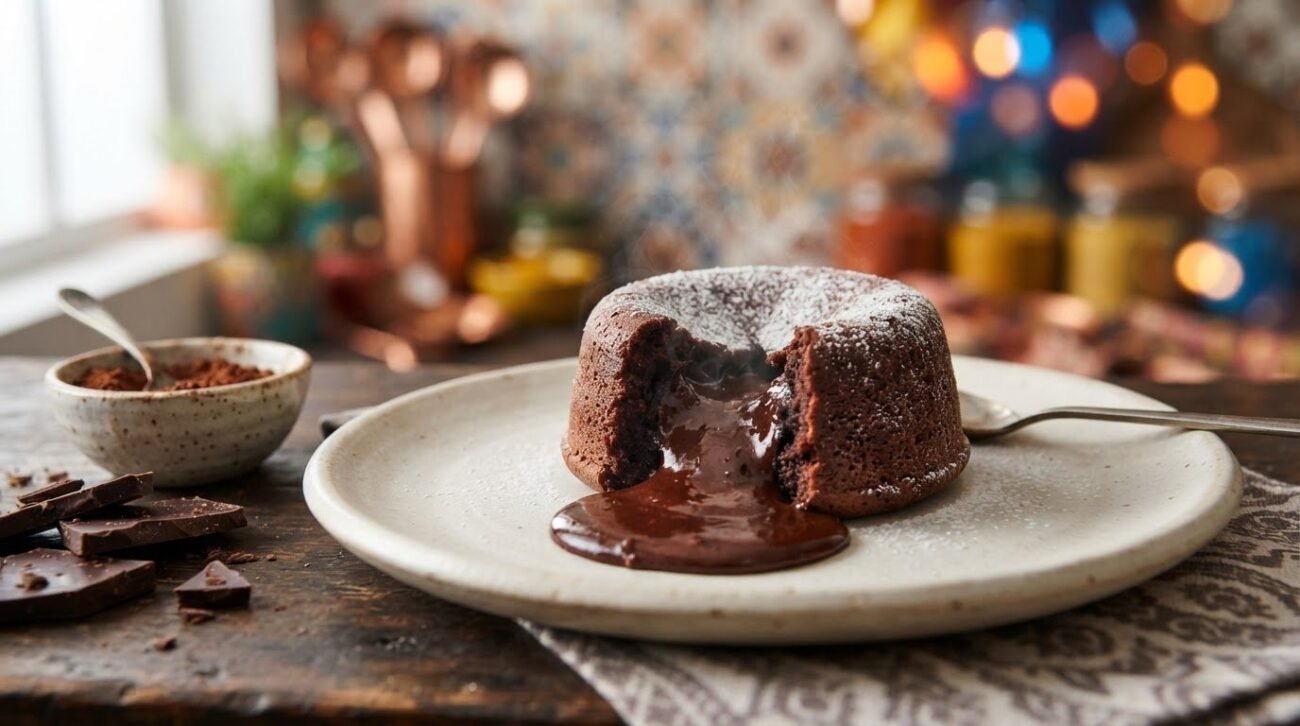
A molten centre depends on the balance between chocolate, flour and bake time, not a complicated technique. This choco lava cake recipe takes 22 minutes from preparation to cooking, makes 4 servings and bakes in a preheated oven at 220°C. Let each cake cool in its ramekin for one minute before unmoulding, so the delicate edges have a moment to settle.
It’s frustrating when a choco lava cake turns out fully set or collapses before it reaches the plate. A few careful choices make the process easier to manage. Learn how to choose chocolate and flour, melt chocolate and butter smoothly, and store batter when preparing ahead. Then fill the ramekins and judge the bake for a soft cake with a flowing centre. Practical ingredient substitutions can also change the flavour and texture, helping you make this warm, chocolatey dessert your own.
Key Takeaways
- Choose chocolate for the flavour and richness you want, and use flour thoughtfully because it affects the cake’s structure.
- Preheat the oven and use the recommended bake cues to help keep the centre soft while the edges set.
- Melt chocolate and butter gently, stirring between short heating intervals to create a smooth mixture.
- Prepare batter ahead with careful storage, then bring it back to a bakeable consistency before filling the ramekins.
- Make ingredient swaps with texture in mind; changing the chocolate or flour can alter how the finished dessert tastes and holds together.
Baking temperature and timing
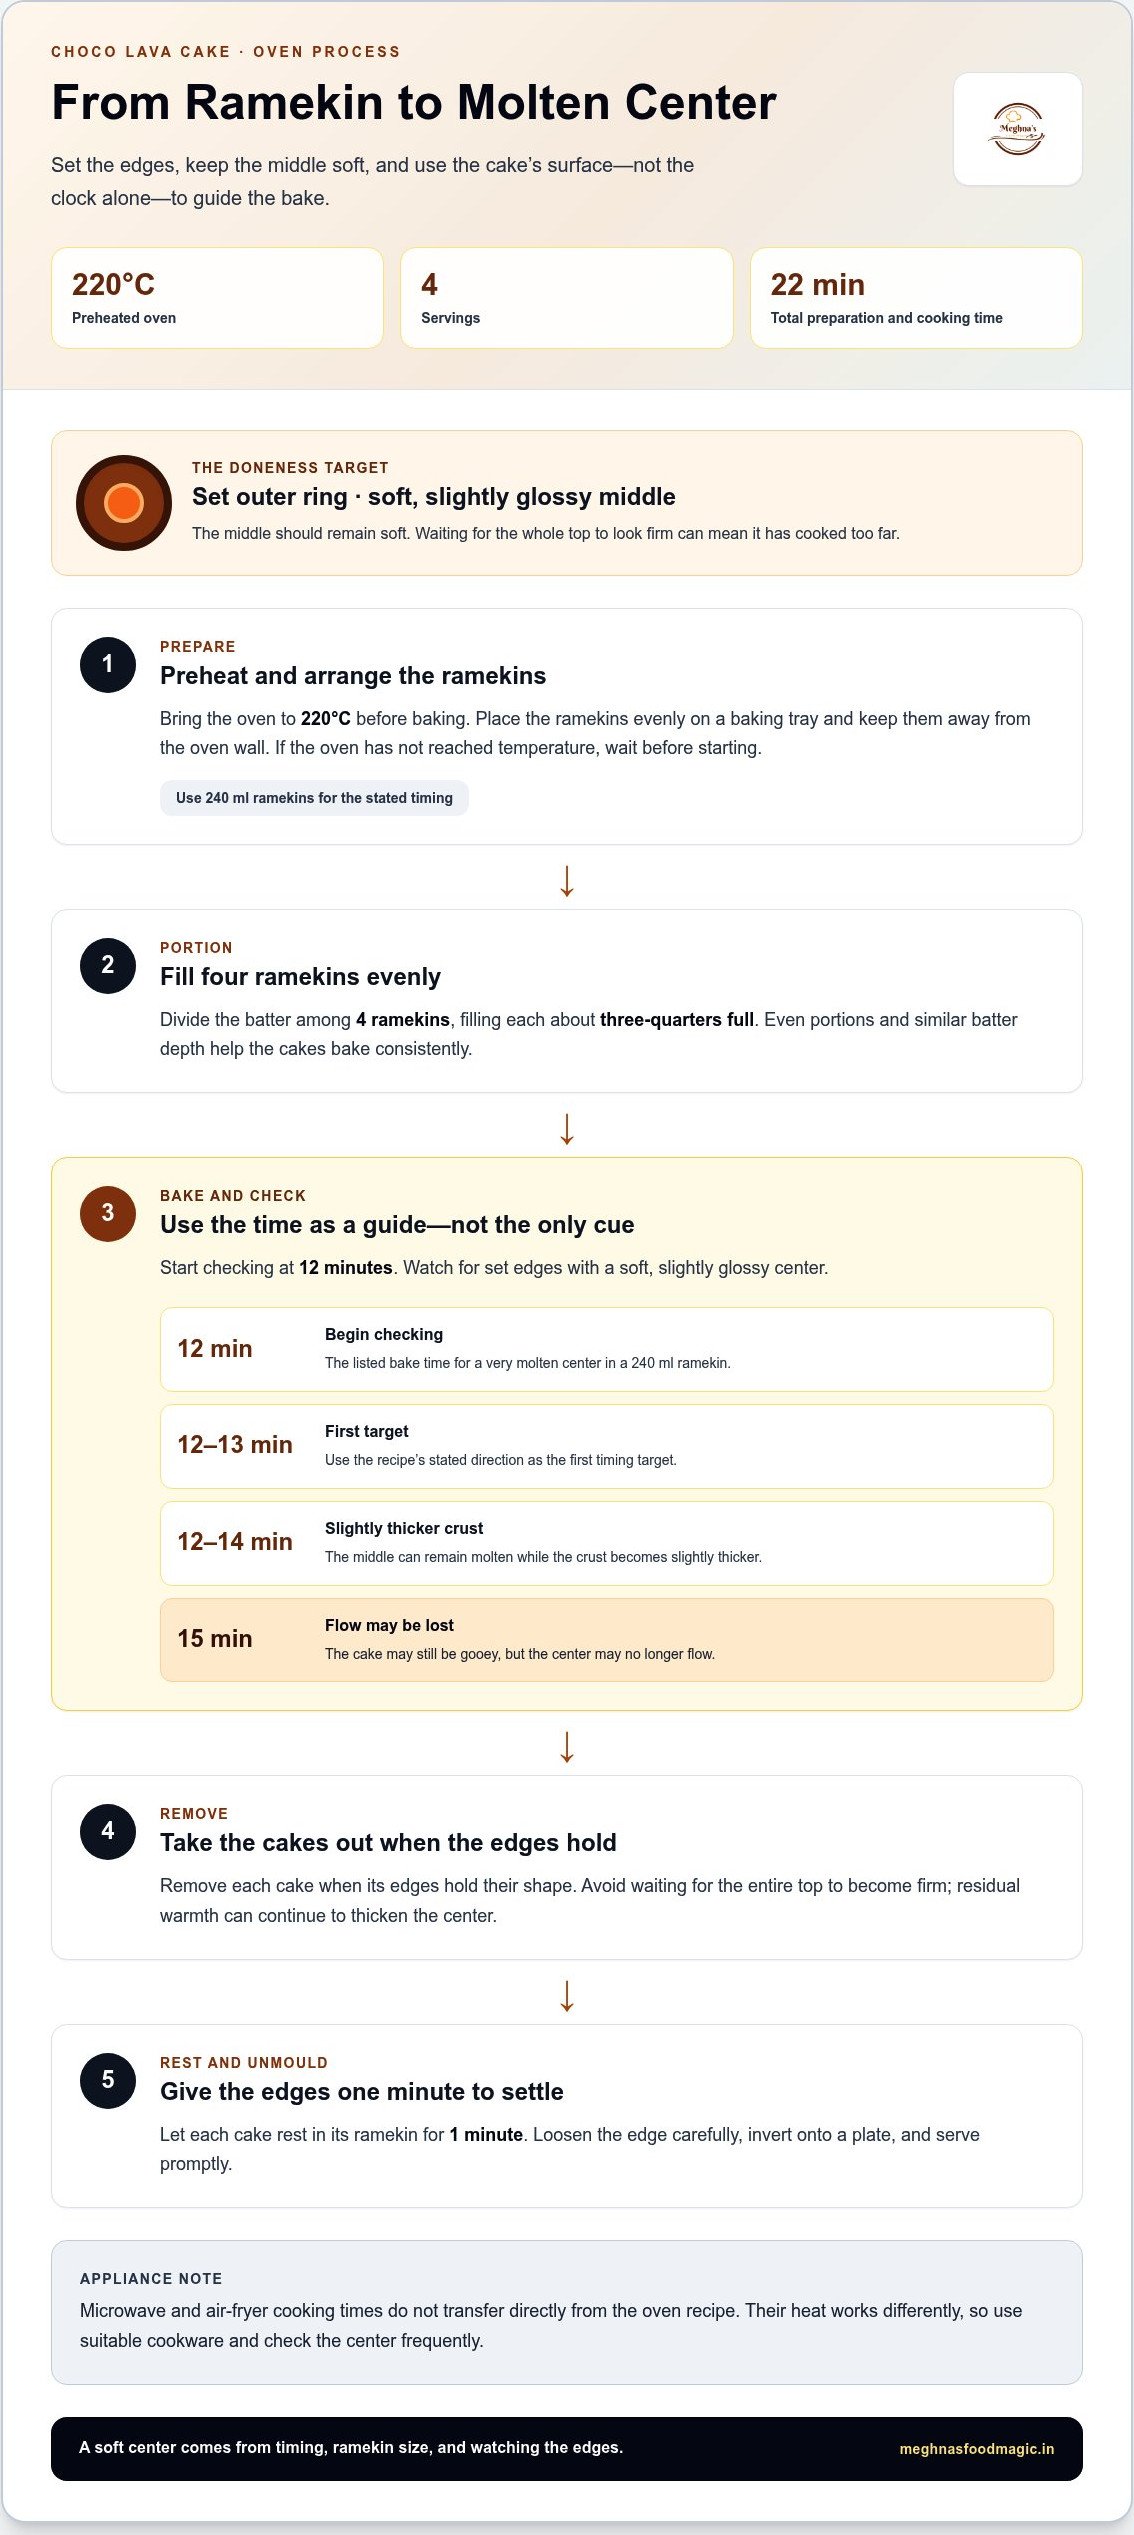
Bake the filled ramekins until the edges are set while the centres remain soft. Microwave and air-fryer versions are possible, but oven timing doesn’t transfer directly because each appliance heats the batter differently.
-
Set the Baking Temperature
Preheat your oven to 220°C before the ramekins go inside. A fully heated oven helps the outer layer begin setting promptly while the centre stays molten. Arrange the ramekins evenly on a baking tray, and avoid placing them against the oven wall. If the oven hasn’t reached temperature, wait before baking; starting too early can make the timing harder to judge.
-
Check Baking Time and Doneness
Start checking at 12 minutes, the listed bake time for a very molten centre in a 240 ml ramekin. At 12 to 14 minutes, the cakes can retain a molten middle with a slightly thicker crust. At 15 minutes, the texture may be gooey, but the centre may no longer flow. Use the recipe’s 12-to-13-minute direction as your first target.
- Watch the cake’s surface as well as the clock. The outer ring should look set, while the middle remains soft and slightly glossy. Avoid waiting for the entire top to look firm; that can mean the centre has cooked too far. Ramekin size matters, so use 240 ml ramekins for the stated timing. A different vessel changes batter depth and affects how quickly heat reaches the middle.
- For microwave or air-fryer cooking, use the oven recipe as a guide to ingredients, not as a direct timing chart. Both appliances can cook individual portions, but their heat works differently from a conventional oven. Use cookware suited to the appliance, cook cautiously, and check the centre frequently. An air fryer’s circulating heat can set the outside quickly, while a microwave may heat the batter unevenly.
- Remove each cake when its edges hold their shape, then let it rest in the ramekin for one minute before unmoulding. This brief pause lets the delicate outside settle without leaving the centre to bake much longer. Loosen the edge carefully and invert the cake onto a plate. Serve promptly, as the residual warmth can thicken the molten middle.
The recipe takes 22 minutes in total and yields 4 servings. For a reliable first bake, follow the 220°C oven setting and begin checking at 12 minutes. Note whether the centre flows or stays soft, then adjust the next batch’s timing based on that result.
Timing details can vary between recipe descriptions, so keep each stated duration attached to its own instructions. The choco lava cake recipe has a stated cook time of 30 minutes. The chocolate lava cake recipe takes 10 minutes of preparation and 12 minutes of cooking. The choco lava cakes should bake for 10-12 minutes, a separate baking-time direction that can be checked against the cake’s edges and centre.
After baking, the cakes should cool for 1-2 minutes before unmoulding. This gives the outside a brief chance to settle while keeping the timing guidance distinct from the stated preparation and cooking durations.
Chocolate lava cake ingredients
A choco lava cake is a small chocolate cake with a soft, flowing centre. The outside sets during baking while the middle stays less cooked.
- Choose the chocolate. Use 200 grams of dark chocolate for a deep, bittersweet flavour. Chopped chocolate melts evenly when the pieces are similar in size. For a sweeter, gentler taste, a separate formula uses 180 grams of semi-sweet chocolate. Chocolate choice affects sweetness and richness, so taste the chocolate before adding sugar.
- Measure the butter and prepare the moulds. For the dark-chocolate formula, weigh 100 grams of unsalted butter. Butter adds richness and helps the melted chocolate form a smooth base. Keep a little extra butter for greasing the ramekins. Coat the base and sides carefully, since ungreased spots can make unmoulding difficult.
- Set out the eggs and sugar. Use 2 large eggs with 100 grams of powdered sugar for the dark-chocolate formula. The eggs help bind the batter, while sugar adds sweetness and supports its structure. For the semi-sweet version, use 1 whole egg, 1 egg yolk and 50 grams of sugar. Measure before mixing to keep each formula balanced.
- Weigh the flour precisely. Add 50 grams of all-purpose flour to the dark-chocolate mixture. A separate semi-sweet formula uses 15 grams of all-purpose flour. Flour gives the cake enough structure to hold its shape, but too much can make the centre cakey rather than molten. Level the measure, then fold it in gently.
- Keep the ingredient ratios together. Don’t combine the 200-gram dark-chocolate formula with the smaller quantities from the semi-sweet version. Each set is a distinct balance of chocolate, butter, eggs, sugar and flour. Choose one complete formula, then measure every ingredient before mixing. This makes it easier to spot an accidental omission.
- Prepare the ramekins. Divide the finished batter among 4 ramekins or small oven-safe bowls, filling each about three-quarters full. That space lets the batter rise without spilling over. If using the stated 240 ml ramekins, keep the portions even. Similar batter depth helps the cakes bake consistently.
For more kitchen inspiration after choosing your chocolate, explore Meghna’s recipe videos. In the next stage, careful melting helps bring the measured chocolate and butter together smoothly.
Make-ahead batter and storage
Yes. For a simple homemade version, combine chocolate, butter, eggs, sugar and flour, then bake the batter in individual portions. You can prepare the batter ahead, but keep it covered in the refrigerator and expect chilled batter to bake differently from batter at room temperature.
- Measure one complete formula. Use 200 grams dark chocolate, 100 grams unsalted butter, 2 large eggs, 100 grams powdered sugar and 50 grams all-purpose flour. Keep the ingredients together as one recipe. Accurate proportions help the cakes hold their shape while keeping the middle soft.
- Prepare the ramekins before mixing. Grease 4 ramekins evenly, including their bases and sides. Set them on a tray so filling and moving them is easier. This matters especially with batter prepared ahead; a ready tray reduces handling once the mixture is combined.
- Mix the eggs and sugar. Whisk the 2 eggs with the powdered sugar until blended and slightly thickened. This distributes the sugar through the eggs and creates a more even base. Avoid leaving dry sugar at the bottom of the bowl, where it can affect the final mixture.
- Fold in the chocolate mixture carefully. Add the melted chocolate and butter to the egg mixture gradually, stirring until the colour looks uniform. Sift in the 50 grams of flour, then fold just until no dry streaks remain. Overmixing after adding flour can make the cake denser.
- Portion before chilling. Divide the batter among the 4 greased ramekins, filling each about three-quarters full. Cover the ramekins and refrigerate them if you’re preparing ahead. Portioning first avoids repeatedly stirring or transferring the batter later, which can disturb its texture.
- Plan for the chilled batter. Cold batter is firmer than freshly mixed batter, so its edges and centre may warm at different rates. Keep the portions covered until baking, then judge doneness by the set outer edge and soft middle. Don’t assume the usual baking time will give identical results straight from the refrigerator.
- Finish and serve promptly. Bake the prepared portions in a preheated 220°C oven, then rest each cake in its ramekin for one minute before turning it out. For a flowing middle, pay attention to the centre rather than waiting for the whole surface to look firm. Serve soon after unmoulding.
For a visual guide to mixing and folding, explore these recipe demonstrations alongside the steps above.
Use 3/4 as the fill level when portioning each ramekin, checking the batter against the sides rather than relying only on a quick glance at the tops. Aim for the same approximate level in every portion, and pause to correct any obvious difference before covering them. This keeps the portions aligned with the stated fill guidance without changing the formula or adding extra batter.
If a ramekin looks fuller than the others, redistribute a little batter while it is still easy to do so. Keep the portions covered after filling, and avoid topping them up later. The useful check is simple: each filled ramekin should sit at about 3/4 full, not filled to the rim.
Melting chocolate and butter
Gentle, even heat helps chocolate and butter combine into a glossy mixture. Use the microwave in short bursts or a double boiler for steadier control, then stir until no solid pieces remain.
- Chop the chocolate evenly. Cut the dark chocolate into small, similar-sized pieces before heating. They soften at a similar pace, reducing the risk of scorching thin edges while larger chunks stay firm. Add the measured butter to the same microwave-safe bowl, or set both ingredients aside for the double-boiler method.
- Use short microwave intervals. Heat the chocolate and butter for 20 seconds, then remove the bowl and stir. The mixture may still look partly solid, but softened chocolate can melt further as you stir. If unmelted pieces remain, microwave for another 10 seconds, then stir again.
- Let residual warmth do some work. After each microwave burst, stir from the bowl’s edges towards the centre. The warmer melted mixture helps soften the remaining chocolate without another long heating cycle. Continue only as needed: overheating can make chocolate thick or grainy and harder to blend smoothly into the batter.
- Choose a double boiler for steady heat. Place chopped chocolate and butter in a heatproof bowl over a saucepan of gently simmering water. Keep the bowl’s base above the water, not touching it. Stir as the ingredients soften. This indirect heat gives you close control without placing the chocolate directly over a flame.
- Keep water away from the chocolate. Dry the bowl and spoon before you start, and avoid splashes from the saucepan. Even a small amount of water can make melted chocolate seize into a stiff, clumpy mass. If condensation forms beneath the bowl, wipe it away before lifting or tilting the mixture.
- Stop when the mixture looks uniform. Remove the bowl once the chocolate has melted and the butter is incorporated. Stir until glossy, with no visible butter streaks or chocolate lumps. Don’t keep heating just to make the mixture hotter; excess heat can spoil its texture.
- Blend it into the batter gradually. Let the melted mixture settle briefly, then pour it into the eggs and sugar while stirring. Add it steadily rather than all at once for an even batter. If the chocolate looks oily or stiff, pause and stir before adding flour. Smooth chocolate helps give the finished cake an even crumb.
Chocolate and flour substitutions
For an eggless lava cake, start with a recipe developed to work without eggs; simply removing them changes the batter’s binding and structure. The measured versions below use eggs, so choose one complete formula rather than mixing quantities across recipes.
- Make a dark chocolate version. Ingredients: 200 grams dark chocolate, 100 grams unsalted butter, 2 large eggs, 100 grams powdered sugar and 50 grams all-purpose flour. Melt the chocolate with the butter, whisk the eggs and sugar, then combine. Fold in the flour until no dry streaks remain. For a different flour, choose a blend intended for baking and test that substitution separately.
- Choose a sweeter semi-sweet version. Ingredients: 180 grams semi-sweet chocolate, 50 grams butter, 1 whole egg, 1 egg yolk, 50 grams sugar and 15 grams all-purpose flour. Melt the chocolate and butter, then whisk the egg, yolk and sugar together. Stir in the chocolate mixture, followed by the flour. This smaller flour amount belongs to this specific ingredient balance, not the dark chocolate formula.
- Try a bittersweet variation. Ingredients: 168 grams chopped bittersweet chocolate, 1/2 cup unsalted butter, 2 eggs, 2 egg yolks, 1/4 cup sugar, 2 tablespoons all-purpose flour and ⅛ teaspoon salt. Melt the chocolate with butter. Whisk eggs, yolks and sugar, then combine with the chocolate. Fold in flour and salt. Keep the flour amount intact; swapping in cocoa powder would not provide the same structure.
- Adjust one ingredient at a time. Compare dark, semi-sweet and bittersweet chocolate for sweetness and flavour, while keeping each recipe’s other proportions unchanged. If testing a flour alternative, make that the only change. Browse recipe ideas for more baking inspiration, and use notes on flavour and texture to guide your next trial.
For visual guidance on mixing different batters, explore Meghna’s recipe demonstrations as you try a variation.
Choose a complete recipe developed specifically to work without eggs. Simply omitting eggs from the versions above can change the cake’s binding and structure.
Meghna’s Food Magic: Free Digital Recipe Database
Meghna’s Food Magic offers a free digital recipe database for home cooks looking for their next kitchen idea. Explore Cake Therapy for baking inspiration, or browse High Protein Recipes, Millets Recipes and Weight Loss Fitness Recipes when you’re in the mood for something different.
Chef Meghna’s Notes
When testing a variation, change one ingredient at a time and note what you changed. If the cake turns out denser than expected, review the flour measure and mixing. If it tastes too sweet, try a less-sweet chocolate next time. Keeping simple tasting notes helps you refine the recipe without changing several factors at once.
Visit Meghna’s Food Magic to explore recipes and find inspiration for your next kitchen experiment.
Bring a little creativity to your next bake
Make your next choco lava cake part of a moment, not just a recipe. Choose a simple plate, add fresh fruit or a light dusting of cocoa, and serve while the centre is still soft. Thoughtful presentation can make a homemade dessert feel special, whether you’re sharing it with family or enjoying a quiet treat.
Let each kitchen experiment reflect your taste. A different style of chocolate or a new serving touch can make the experience feel fresh, while your notes help you remember what you enjoyed. Cooking invites curiosity, and every batch is another chance to create something warm and personal.
Trust your senses, enjoy the process, and serve that first spoonful of molten chocolate with pride.
Frequently Asked Questions
What ingredients and equipment are needed for choco lava cake?
Gather dark chocolate, unsalted butter, eggs, powdered sugar and all-purpose flour, plus extra butter for greasing. You’ll need a weighing scale, mixing bowls, a whisk, a spatula and oven-safe ramekins. A microwave-safe bowl works for melting, or use a heatproof bowl over a saucepan. Keep a baking tray nearby to move filled ramekins safely into the oven.
How long and at what temperature should this dessert be baked?
Preheat a conventional oven to 220°C and use 12 to 13 minutes as the recipe’s starting bake time. Begin checking at 12 minutes: the edges should look set, while the centre remains soft. Ramekin size and batter depth affect how quickly each portion cooks, so look for those visual cues rather than waiting for the whole top to firm.
How do you prevent chocolate lava cake from overbaking or sticking to the ramekin?
Grease the base and sides of each ramekin thoroughly, reaching into the corners with softened butter. For a molten middle, check the cake as the edges set; a fully firm surface may mean the centre has cooked too long. After baking, leave the cake in its ramekin for one minute, then loosen the edge gently before turning it onto a plate.
How many calories are in a serving?
One recipe lists 884 kcal per serving. Treat that figure as specific to its ingredient quantities and serving size, rather than a universal value for every homemade version. Using different chocolate, butter, sugar or portion sizes changes the total. For a meaningful comparison, weigh the ingredients you use and divide the finished recipe into equal portions.
How should the cakes be stored and reheated?
To prepare ahead, portion the batter into greased ramekins, cover them and refrigerate until you’re ready to bake. Chilled batter may need closer attention because its centre warms differently from freshly mixed batter. To store baked cakes, cover and refrigerate them. Reheat gently, checking often; reheating can set the molten middle, so serve as soon as the cake is warm.
Disclaimer
This is a recipe food blog page and not nutrition or doctor and hence do not claim to cure any illness. If you have specific health issues please consult a qualified doctor or certified nutritionist.
I do consult experts, research Internet and at times seek help from Gemini to collect relevant information to put together some of these blogs.

